Have you ever finished a roll of film early, only to have the camera automatically rewind it back into the canister? Fear not, film photography enthusiasts! This guide will show you two methods for safely retrieving stuck film, whether you have a handy film retriever tool or not.
Method 1: Using a Film Picker
For the most reliable and stress-free film extraction, a film retriever is the way to go. Here’s how to use it:
Take your time and be gentle. Rushing can damage the film.
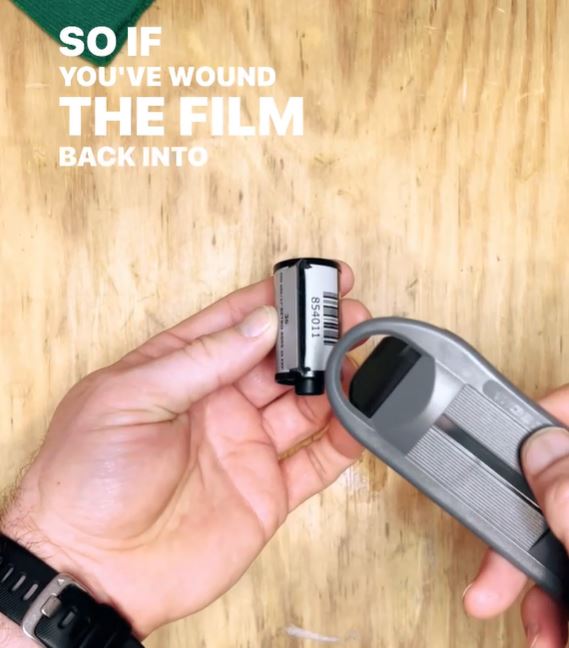
Insert the pronged end of the retriever into the canister slot.
Slide the first retrieval slide on the tool forward.
Rotate the canister spindle counter-clockwise. Pay close attention for a clicking sound.
Stop after you hear four clicks. This ensures proper film engagement.
Slide the second retrieval slide forward.
With a swift, but controlled pull, separate the retriever and film canister. The film should now be safely extracted!
If you don’t have a film retriever, don’t worry! You can improvise with a spare roll of film. There are video tutorials available online that can walk you through this process in detail the one below is a video I made a few years ago.
Most of us wouldn’t know use or even know about hypo clearing agents and what they do. In this video, I break down the benefits and use case of a HCA, and talk about the Safety, Handling and Disposal of Kodak’s own HCA. You can buy Kodak Hyper Clear here or the Liquid version as Ilford Wash Aid here.
Ilford’s Ilfostop is a prime example of a modern, odourless stop bath. Let’s talk about what’s in it, and how to use it properly. You can order it here
Learn how to create a short roll of film for testing 35mm film cameras using a used film canister and a new roll of film. This guide provides step-by-step instructions and essential tips for photography enthusiasts.
Introduction:
When it comes to testing 35mm film cameras or troubleshooting potential issues, creating a short roll of film can be incredibly helpful. This simple technique allows you to check the functionality and performance of your camera without wasting an entire roll of film. In this guide, we’ll walk you through the process of making a short roll of film using a used film canister and a new roll of film.
Step 1: Gather the necessary materials
To begin, gather a used film canister and a fresh roll of 35mm film, tape, scissors and a film changing bag. The used film canister should be empty except for a small bit of residual film that is capable of securely holding the new roll of film.
Step 2: Prepare the canister
Ensure the used film canister is clean and dry. Take a moment to inspect the canister for any physical damage or debris that could affect the film’s performance or scratch the film.
Step 3: Load the new roll of film
Carefully unwind a small portion of the leader from the new roll of film. Cut it in a straight line and tape it to the small leader sticking out of the empty canister. Gently wind the film onto the spool, ensuring it remains taut and evenly distributed throughout the canister.
Step 4: Move the canisters into the darkbag
Pull the two rolls apart inside the dark bag to the desired length of the short roll, I find the width of film changing bag is perfect for a roll of about 12 shots. Ensure the film is fully protected from exposure to light, as even brief exposure can ruin the images.
Step 5: Label the canister
To avoid confusion, label the canister with essential information such as the film type, ISO/ASA rating, and the number of exposures. This labeling will help you keep track of the film’s characteristics during testing.
Step 6: Testing your camera
Now that you have your short roll of film ready, insert it into your 35mm film camera as you would with a regular roll. Follow your camera’s instructions for loading film, advancing frames, and rewinding. Use this opportunity to capture a few test shots in various lighting conditions and different settings. By doing so, you can evaluate the camera’s performance, exposure accuracy, focus, and any potential issues.
Conclusion:
Creating a short roll of film for testing 35mm film cameras is a practical technique that saves both time and resources. By repurposing a used film canister and a new roll of film, you can easily assess your camera’s functionality and troubleshoot any issues before committing to a full roll. This process allows you to fine-tune your camera settings and gain confidence in its performance. Now you’re ready to embark on your photographic journey with a reliable and well-tested film camera!
Remember to have fun and experiment with different settings and subjects to truly understand your camera’s capabilities. Happy shooting!
If you’re looking to capture a timeless, classic look in your photographs, black and white T-grain film is an excellent choice. This type of film has been around for decades and is still popular among photographers today, thanks to its unique properties and ability to produce images with a distinctively fine grain structure. In this article, we’ll explore everything you need to know about black and white T-grain film, from its history and characteristics to how to use it effectively in your photography.
History of T-Grain Film
T-grain film was first introduced by Kodak in the 1980s as a replacement for traditional grain film. Unlike conventional silver halide crystals, which are roughly cubical in shape, T-grain crystals are elongated and thin, with a flattened shape that reduces the appearance of grain in the final image. This allows for sharper, more detailed images that retain their clarity even when enlarged.
Ilford Delta400 in Kodak Tmax Developer
Characteristics of T-Grain Film
Black and white T-grain film has several key characteristics that make it a popular choice among photographers. One of the most significant is its fine grain structure, which gives photographs a smooth, almost silky appearance. This makes it an ideal choice for portraits, landscapes, and other types of photography where detail and texture are important.
T-grain film also tends to have a wide exposure latitude, meaning that it can produce excellent results even when over or underexposed. This makes it a versatile choice for a range of lighting conditions, from bright sunlight to dimly lit interiors.
Fuji GW690II Delta 400 in Kodak T Max Developer
Types of T-Grain Film
There are several types of black and white T-grain film available on the market, each with its own unique characteristics and properties. Some of the most popular include:
Kodak T-Max
Kodak T Max 100 in TMax Developer
Kodak T-Max is one of the most widely used types of T-grain film, known for its high resolution and excellent tonal range. It produces images with a smooth, fine-grained appearance and is suitable for a wide range of photographic applications.
Kodak T Max 100 in TMax Developer
Ilford Delta
Ilford Delta is another popular type of T-grain film, known for its sharpness and contrast. It has a slightly coarser grain structure than T-Max but still produces images with excellent detail and tonality.
Fujifilm Neopan
Fujifilm Neopan is a black and white T-grain film that is popular among fine art photographers. It produces images with a distinctively soft, muted appearance and has a slightly larger grain structure than some other types of T-grain film.
Using T-Grain Film in Your Photography
If you’re interested in using black and white T-grain film in your photography, there are a few things to keep in mind. First, it’s important to choose the right type of film for your needs, based on factors like resolution, contrast, and tonality.
Next, it’s important to understand how to expose T-grain film properly. Because it has a wider exposure latitude than traditional grain film, it’s possible to over or underexpose it without compromising the final image. However, it’s still important to pay attention to factors like lighting, contrast, and shadow detail to ensure that your photographs turn out as intended.
Finally, when developing T-grain film it’s important to choose a developer that is compatible with its unique properties. Many photographers recommend using a fine-grain developer, which is specifically designed to minimize the appearance of grain in the final image. Some popular options include Kodak T-Max Developer, Ilford Ilfosol 3, and Ilford Perceptol.
It’s also important to pay attention to the dilution and temperature of your developer solution. Diluting your developer can help to control contrast and produce a more even tonality, while adjusting the temperature can affect the speed and efficiency of the development process. Be sure to follow the manufacturer’s instructions carefully and experiment with different dilutions and temperatures to find the combination that works best for your particular type of T-grain film and photographic style.
Conclusion
Black and white T-grain film is a classic choice for modern photographers looking to capture timeless, beautiful images. Its fine grain structure, wide exposure latitude, and excellent tonality make it a versatile
Camera:Rolleiflex K4B Film: Fomapan 100 Paper: Fomatone MG Classic Warm Tone (132 Matt) Paper Dev: Moersch Easy Lith 10ml(A)+15ml(B)+800ml(Water)+200(Old Brown) at 34 degrees centigrade
Darkroom Print Toning: A Guide to Enhancing Your Black and White Prints
As photographers, we are always looking for ways to elevate our work and make it stand out. One way to do this is through the use of darkroom print toning. This process involves adding colour to black and white prints, resulting in a unique and eye-catching final product. In this article, we will guide you through the process of darkroom print toning, from the materials needed to the different toning techniques available.
What is Darkroom Print Toning?
Darkroom print toning is a technique that involves changing the colour of the silver particles in a black and white print. This is done by immersing the print in a toner solution that contains metal salts. These salts react with the silver particles in the print, causing them to change colour. The result is a print with a different hue or tint, ranging from warm browns and sepia to cool blues and greens.
Materials Needed for Darkroom Print Toning
Before we dive into the different toning techniques, let’s go over the materials needed for darkroom print toning. Here are the essentials:
It’s important to note that not all toners are created equal. Different toners will produce different effects, so it’s worth experimenting with different brands and formulas to find the one that best suits your vision.
Toning Techniques
There are several different toning techniques available to photographers, each with its own unique effect. Let’s explore the most popular techniques:
Sepia Toning
Sepia toning is perhaps the most well-known and widely used toning technique. This involves immersing the print in a solution that contains either sodium or potassium sulfide. This chemical reaction creates warm brown tones in the print, giving it a classic and timeless look.
Selenium Toning
Selenium toning is another popular technique, known for its ability to enhance the print’s shadow detail and increase its archival properties. This technique involves immersing the print in a solution that contains sodium selenite or sodium selenate. This creates a purple-brown tint in the print, resulting in a striking and dramatic effect.
Blue Toning
Blue toning is a less common technique but can be used to great effect in certain images. This involves immersing the print in a solution that contains ferric ammonium citrate and potassium ferricyanide. This creates blue tones in the print, giving it a cool and ethereal feel.
Gold Toning
Gold toning is a technique that creates warm brown tones similar to sepia toning, but with a slightly different hue. This technique involves immersing the print in a solution that contains gold chloride. Gold toning can be used to enhance the mid-tones and highlights in a print, resulting in a richer and more vibrant final product.
Tips for Successful Darkroom Print Toning
Now that you know the different toning techniques, here are some tips for achieving great results:
Start with a well-exposed and well-developed print. The toning process will not fix underexposed or poorly developed images.
Use fresh solutions for each toning session. Old or contaminated solutions can produce inconsistent or undesirable results.
Experiment with different toners and toning times to find the effect that best suits your vision.
Rinse the print thoroughly between each solution to avoid cross-contamination and ensure even toning.
Keep detailed notes of your process, including the type of toner used
I have posted some of my results below mostly for my own future reference, the eagle eyed among you will note that for the most part it is the same print over and over and over again. This is because of my relentless application of scientific methods. The trick is to use the science to constrain the fun and artfulness of the process.
Camera:Rolleiflex K4B Film: Fomapan 100 Paper: Fomatone MG Classic Warm Tone (132 Matt) Initial Paper Dev: Ilford Multigrade Toner: Moersch MT3 Vario Sulphide – Toner 50ml, Controller 30ml Water 900ml Bleach: 1+20 for 15 seconds then toned for 30 Seconds.
Camera:Rolleiflex K4B Film: Fomapan 100 Paper:Fomatone MG Classic Warm Tone (132 Matt) Initial Paper Dev: Ilford Multigrade Toner: Moersch MT3 Vario Sulphide – Toner 50ml, Controller 130ml Water 900ml Bleach: 1+20 for 30 seconds then toned for 30 Seconds.
Camera:Rolleiflex K4B Film: Fomapan 100 Paper:Fomatone MG Classic Warm Tone (132 Matt) Initial Paper Dev: Ilford Multigrade Toner: Moersch MT5 Sepia Polysulphide – mixed 1+30 Bleach: 1+20 for 10 seconds then toned for 30 Seconds.
Camera:Nettar Zeiss Ikon Film: Fomapan 100 Paper:Fomatone MG Classic Warm Tone (132 Matt) Initial Paper Dev: Moersch Easy Lith 10ml(A)+15ml(B)+800ml(Water)+200(Old Brown) at 34 degrees centigrade Toner: Fotospeed AU20 Gold Toner 1 Min
Camera:Nettar Zeiss Ikon Film: Fomapan 100 Paper:Fomatone MG Classic Warm Tone (132 Matt) Initial Paper Dev: Ilford Multigrade Toner: Moersch MT3 Vario Sulphide – Toner 50ml, Controller 130ml Water 900ml Bleach: 1+20 for 2 mins then toned for 30 Seconds.
Camera:Nettar Zeiss Ikon Film: Fomapan 100 Paper:Fomatone MG Classic Warm Tone (132 Matt) Initial Paper Dev: Ilford Multigrade Toner: Rollei Selenia (Selenium) 1+20 Toned for 30 Seconds.
Camera:Rolleiflex K4B Film: Ilford Hp5 100 Paper:Ilford Multigrade IV RC Initial Paper Dev: Ilford Multigrade Bleach: 1+20 for 4 minutes pretty much wiped the image Re-developed: Ilford Warm Tone Print Developer
Camera:Rolleiflex K4B Film: Ilford Hp5 100 Paper:Ilford Multigrade IV RC Initial Paper Dev: Ilford Multigrade Toner: Rollei Selenia (Selenium) 1+20 Toned for 30 Seconds If you made it this far, well done, my conclusions remain inconclusive.. Experimentation seems to be the key. I think I prefer the results on the fibre paper, they are certainly more dramatic and seem to take a tone better.
A quick note for anyone freaking out about my spelling of the word colour, it is correct where I live!
Ferrania Film P30, Black and White Film, Shot with Olympus RC35 Developed in Kodak Tmax
If you’re a film photographer or simply interested in the art of analog photography, chances are you’ve heard of Ferrania Film P30. This classic film stock has been around for decades, and has garnered a cult following among photographers who love its unique look and feel. In this article, we’ll dive into what makes Ferrania Film P30 so special, how to shoot with it, and some tips for getting the best results.
What is Ferrania Film P30?
Ferrania Film P30 is a black and white film stock that was first introduced in the 1960s by the Italian company Ferrania. It quickly became popular among photographers for its fine grain, high contrast, and rich tonal range. However, production of Ferrania Film P30 was eventually discontinued in the early 2000s due to declining demand for analog film.
In recent years, Ferrania Film P30 has experienced a revival thanks to a successful crowdfunding campaign that allowed the company to restart production. Today, Ferrania Film P30 is once again available for purchase, and has become a favourite among film photographers who appreciate its classic look and feel.
Ferrania P30 35mm 36 exposures
Shooting with Ferrania Film P30
If you’re interested in shooting with Ferrania Film P30, there are a few things you should keep in mind. First and foremost, it’s important to note that this film stock has a relatively slow speed of ISO 80. This means that it’s best suited for shooting in bright, well-lit conditions, or with a tripod to ensure sharpness.
When it comes to developing Ferrania Film P30, there are a few different options available. Some photographers prefer to develop it using traditional methods, while others have had success with more experimental techniques such as stand development or using caffenol (a coffee-based developer). Ultimately, the best method will depend on your personal preferences and the look you’re going for. The photos here where all developed in Kodak Tmax
Ferrania Film P30, Black and White Film, Shot with Olympus RC35 Developed in Kodak Tmax
Tips for Getting the Best Results
If you’re new to shooting with Ferrania Film P30, there are a few tips and tricks you can use to get the best results. Here are some of our favorites:
1. Experiment with different developers
As mentioned earlier, there are a variety of developers you can use when developing Ferrania Film P30. Experimenting with different developers can help you achieve different looks and styles, so don’t be afraid to try something new.
2. Shoot in bright, well-lit conditions
Since Ferrania Film P30 has a relatively slow speed of ISO 80, it’s best to shoot in bright, well-lit conditions to ensure proper exposure and sharpness.
3. Embrace the grain
One of the hallmarks of Ferrania Film P30 is its fine grain. Rather than trying to eliminate the grain, embrace it and use it to your advantage to create a unique and textured look.
4. Don’t be afraid of high contrast
Ferrania Film P30 is known for its high contrast, so don’t be afraid to embrace this aspect of the film. Use it to create dramatic and impactful images that stand out.
Ferrania Film P30, Black and White Film, Shot with Olympus RC35 Developed in Kodak Tmax
Conclusion
Ferrania Film P30 is a classic film stock that has become beloved by film photographers for its unique look and feel. If you’re interested in shooting with this film stock, there are a few things you should keep in mind, such as its slow speed of ISO 80 and the different development techniques you can use to achieve different looks. With a little experimentation and some practice, you’ll be able to create stunning images with Ferrania Film P30.
Ferrania Film P30, Black and White Film, Shot with Olympus RC35 Developed in Kodak Tmax
Ferrania Film P30, Black and White Film, Shot with Olympus RC35 Developed in Kodak Tmax
Ferrania Film P30, Black and White Film, Shot with Olympus RC35 Developed in Kodak Tmax
Are you looking for a high-quality colour negative film that can capture natural colours in daylight conditions and provide enhanced sharpness and resolution for high-resolution scanning? Look no further than Flic Film Elektra 100 – a re-spooled Kodak Aerocolor IV colour negative film originally designed for aerial photography and reconnaissance.
In this ultimate guide, we will explore the features and benefits of Flic Film Elektra 100, including its exposure latitude, colour reproduction, T-Grain emulsion, red sensitivity, green saturation, and D-min values. We will also provide tips for loading the film in low light conditions to avoid light leaks.
Features and Benefits of Flic Film Elektra 100
Exposure Latitude
Flic Film Elektra 100 exhibits a wide exposure latitude, making it easy to achieve proper exposure even in challenging lighting conditions. This film can handle overexposure and underexposure better than many other films on the market, giving you more flexibility in your shooting.
Colour Reproduction
One of the standout features of Flic Film Elektra 100 is its true colour rendition. This film captures natural colours in daylight conditions, ensuring that your images look as true to life as possible. This makes it an excellent choice for portrait, landscape, and street photography, as well as any other situation where accurate colour reproduction is essential.
T-Grain Emulsion
Flic Film Elektra 100 uses a T-Grain emulsion, which is known for its ability to produce sharp and detailed images. This emulsion technology results in enhanced sharpness and resolution, making it an ideal film for high-resolution scanning.
Red Sensitivity
Compared to previous aerial films, Flic Film Elektra 100 has a 30nm-longer red sensitivity. This means that it can penetrate haze better and reproduce foliage more accurately, resulting in images with greater depth and detail.
Green Saturation
In addition to its improved red sensitivity, Flic Film Elektra 100 also boasts increased green saturation. This means that greens appear more vivid and lifelike in your images, making it an excellent choice for landscape and nature photography.
D-min Values
Finally, Flic Film Elektra 100 has lower D-min values than previous aerial films. This means that it requires less exposure to light in order to produce an image, resulting in faster printing times and less need for post-processing.
Loading Flic Film Elektra 100 in Low Light Conditions
While Flic Film Elektra 100 is an excellent film for daylight conditions, it is important to note that it has a tendency to let light travel up the leader and into the first three frames. To avoid this, it is recommended that you load the film in low light conditions, such as in a changing bag or in a dimly lit room.
When loading the film, be sure to handle it carefully to avoid touching the emulsion side. Once the film is loaded, advance it to the first frame and take a test shot to ensure that the film is properly seated and the camera is functioning correctly.
Development
Develop in C41 or E6 chemistry, for use as slide film a warming filter is recommended.