Have you ever finished a roll of film early, only to have the camera automatically rewind it back into the canister? Fear not, film photography enthusiasts! This guide will show you two methods for safely retrieving stuck film, whether you have a handy film retriever tool or not.
Method 1: Using a Film Picker
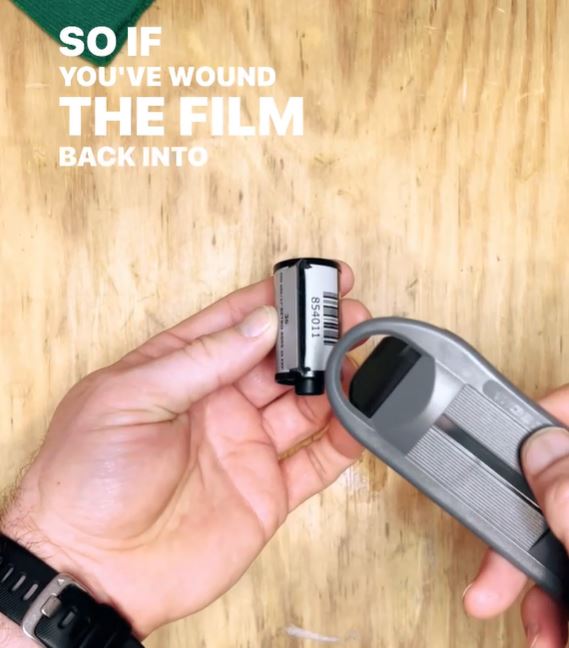
For the most reliable and stress-free film extraction, a film retriever is the way to go. Here’s how to use it:
Take your time and be gentle. Rushing can damage the film.
Insert the pronged end of the retriever into the canister slot.
Slide the first retrieval slide on the tool forward.
Rotate the canister spindle counter-clockwise. Pay close attention for a clicking sound.
Stop after you hear four clicks. This ensures proper film engagement.
Slide the second retrieval slide forward.
With a swift, but controlled pull, separate the retriever and film canister. The film should now be safely extracted!
If you don’t have a film retriever, don’t worry! You can improvise with a spare roll of film. There are video tutorials available online that can walk you through this process in detail the one below is a video I made a few years ago.
Most of us wouldn’t know use or even know about hypo clearing agents and what they do. In this video, I break down the benefits and use case of a HCA, and talk about the Safety, Handling and Disposal of Kodak’s own HCA. You can buy Kodak Hyper Clear here or the Liquid version as Ilford Wash Aid here.
Shooting with large format film cameras has a timeless charm that continues to attract photographers worldwide. The 4×5 large format film holder plays a crucial role in this process, as it holds and protects the light-sensitive film that captures stunning images. We stock a range of 4 x 5 and 8 x 10 film and large format holders and the MOD54 to help you process your large format film.
What is a 4×5 Large Format Film Holder?
A 4×5 large format film holder is a device used to hold a single sheet of 4×5 inch film securely in place inside a large format camera. It typically consists of two parts: a light-tight outer shell and a removable dark slide that covers the film to protect it from exposure to light. Loading the film holder correctly is essential to ensure precise and breathtaking photographs.
Before diving into the loading process, it’s crucial to understand the various parts of a 4×5 film holder. Familiarise yourself with the outer shell, the dark slide, and the film slot where the 4×5 film sheet will be inserted.
Preparing the Film Holder for Loading
To achieve optimal results, proper preparation of the film holder is necessary. Ensure the film holder is clean, and the light seals are intact to prevent any light leaks during exposure.
Cleaning the Film Holder
Using a soft, lint-free cloth, carefully wipe the interior and exterior surfaces of the film holder to remove any dust or debris that might affect the image quality.
Checking the Light Seals
Inspect the light seals of the film holder to ensure they are in good condition. Damaged or worn-out light seals can lead to unwanted light leaks, which can ruin your photographs.
Handling and Loading the Film
Now that the film holder is ready, handle the large format film with care to avoid fingerprints or scratches on its emulsion side. Take the unexposed film and load it into the film holder with the emulsion facing outward. This must be done in a fully light sealed room or a darkbag.
Ilford’s Rapix Fixer is the de facto fixer in the modern era, and is the only one that many of us ever bother to try. Let’s talk about what’s in it, and how to use it properly. You can buy it here
Ilford’s Ilfostop is a prime example of a modern, odourless stop bath. Let’s talk about what’s in it, and how to use it properly. You can order it here
Learn how to create a short roll of film for testing 35mm film cameras using a used film canister and a new roll of film. This guide provides step-by-step instructions and essential tips for photography enthusiasts.
Introduction:
When it comes to testing 35mm film cameras or troubleshooting potential issues, creating a short roll of film can be incredibly helpful. This simple technique allows you to check the functionality and performance of your camera without wasting an entire roll of film. In this guide, we’ll walk you through the process of making a short roll of film using a used film canister and a new roll of film.
Step 1: Gather the necessary materials
To begin, gather a used film canister and a fresh roll of 35mm film, tape, scissors and a film changing bag. The used film canister should be empty except for a small bit of residual film that is capable of securely holding the new roll of film.
Step 2: Prepare the canister
Ensure the used film canister is clean and dry. Take a moment to inspect the canister for any physical damage or debris that could affect the film’s performance or scratch the film.
Step 3: Load the new roll of film
Carefully unwind a small portion of the leader from the new roll of film. Cut it in a straight line and tape it to the small leader sticking out of the empty canister. Gently wind the film onto the spool, ensuring it remains taut and evenly distributed throughout the canister.
Step 4: Move the canisters into the darkbag
Pull the two rolls apart inside the dark bag to the desired length of the short roll, I find the width of film changing bag is perfect for a roll of about 12 shots. Ensure the film is fully protected from exposure to light, as even brief exposure can ruin the images.
Step 5: Label the canister
To avoid confusion, label the canister with essential information such as the film type, ISO/ASA rating, and the number of exposures. This labeling will help you keep track of the film’s characteristics during testing.
Step 6: Testing your camera
Now that you have your short roll of film ready, insert it into your 35mm film camera as you would with a regular roll. Follow your camera’s instructions for loading film, advancing frames, and rewinding. Use this opportunity to capture a few test shots in various lighting conditions and different settings. By doing so, you can evaluate the camera’s performance, exposure accuracy, focus, and any potential issues.
Conclusion:
Creating a short roll of film for testing 35mm film cameras is a practical technique that saves both time and resources. By repurposing a used film canister and a new roll of film, you can easily assess your camera’s functionality and troubleshoot any issues before committing to a full roll. This process allows you to fine-tune your camera settings and gain confidence in its performance. Now you’re ready to embark on your photographic journey with a reliable and well-tested film camera!
Remember to have fun and experiment with different settings and subjects to truly understand your camera’s capabilities. Happy shooting!
If you’re looking to capture a timeless, classic look in your photographs, black and white T-grain film is an excellent choice. This type of film has been around for decades and is still popular among photographers today, thanks to its unique properties and ability to produce images with a distinctively fine grain structure. In this article, we’ll explore everything you need to know about black and white T-grain film, from its history and characteristics to how to use it effectively in your photography.
History of T-Grain Film
T-grain film was first introduced by Kodak in the 1980s as a replacement for traditional grain film. Unlike conventional silver halide crystals, which are roughly cubical in shape, T-grain crystals are elongated and thin, with a flattened shape that reduces the appearance of grain in the final image. This allows for sharper, more detailed images that retain their clarity even when enlarged.
Ilford Delta400 in Kodak Tmax Developer
Characteristics of T-Grain Film
Black and white T-grain film has several key characteristics that make it a popular choice among photographers. One of the most significant is its fine grain structure, which gives photographs a smooth, almost silky appearance. This makes it an ideal choice for portraits, landscapes, and other types of photography where detail and texture are important.
T-grain film also tends to have a wide exposure latitude, meaning that it can produce excellent results even when over or underexposed. This makes it a versatile choice for a range of lighting conditions, from bright sunlight to dimly lit interiors.
Fuji GW690II Delta 400 in Kodak T Max Developer
Types of T-Grain Film
There are several types of black and white T-grain film available on the market, each with its own unique characteristics and properties. Some of the most popular include:
Kodak T-Max
Kodak T Max 100 in TMax Developer
Kodak T-Max is one of the most widely used types of T-grain film, known for its high resolution and excellent tonal range. It produces images with a smooth, fine-grained appearance and is suitable for a wide range of photographic applications.
Kodak T Max 100 in TMax Developer
Ilford Delta
Ilford Delta is another popular type of T-grain film, known for its sharpness and contrast. It has a slightly coarser grain structure than T-Max but still produces images with excellent detail and tonality.
Fujifilm Neopan
Fujifilm Neopan is a black and white T-grain film that is popular among fine art photographers. It produces images with a distinctively soft, muted appearance and has a slightly larger grain structure than some other types of T-grain film.
Using T-Grain Film in Your Photography
If you’re interested in using black and white T-grain film in your photography, there are a few things to keep in mind. First, it’s important to choose the right type of film for your needs, based on factors like resolution, contrast, and tonality.
Next, it’s important to understand how to expose T-grain film properly. Because it has a wider exposure latitude than traditional grain film, it’s possible to over or underexpose it without compromising the final image. However, it’s still important to pay attention to factors like lighting, contrast, and shadow detail to ensure that your photographs turn out as intended.
Finally, when developing T-grain film it’s important to choose a developer that is compatible with its unique properties. Many photographers recommend using a fine-grain developer, which is specifically designed to minimize the appearance of grain in the final image. Some popular options include Kodak T-Max Developer, Ilford Ilfosol 3, and Ilford Perceptol.
It’s also important to pay attention to the dilution and temperature of your developer solution. Diluting your developer can help to control contrast and produce a more even tonality, while adjusting the temperature can affect the speed and efficiency of the development process. Be sure to follow the manufacturer’s instructions carefully and experiment with different dilutions and temperatures to find the combination that works best for your particular type of T-grain film and photographic style.
Conclusion
Black and white T-grain film is a classic choice for modern photographers looking to capture timeless, beautiful images. Its fine grain structure, wide exposure latitude, and excellent tonality make it a versatile
Snap shot of informal actives and timeline – more details below!
Friday 19th – There is a lot to see locally including a horse fair at 1pm. From 8pm in the Enterprise Bar Diz will present some of his 4×5 images Saturday 20th – Meet in the AM and go photograph some of the delights of the local area or venture out on your own. There is an informal portrait shooting session in the beer garden of the Enterprise Bar at 12 noon. In the afternoon Peter Fitzsimons and John Higgins will hold wet plate demonstrations in the Enterprise Bar from 3-5pm Sunday 21st is usually a leisurely look at the local area.
The Gathering in Dungarvan, Co Waterford is celebrating its 5th year of bringing film photography enthusiasts together. The event provides an opportunity for film users to meet old friends and make new ones, share their knowledge and experiences, and have fun photographing in and around the town of Dungarvan. Unlike a club or workshop event, there are no fees involved, and participants can come and go as they please.
The event kicks off on Friday evening at the Enterprise Bar, The Square, Dungarvan, where Diz (Paul Disley) will present images he has shot using his 4 x 5 camera. Roughly 8-9pm. Participants can arrive in Dungarvan early on Friday to photograph at their leisure before meeting up with the group that evening. Alternatively, they can visit the Horse Fair on May 19th at the Sports Centre in Dungarvan, which begins at around 1 pm.
On Saturday morning, participants can visit nearby locations to photograph the coast, mountains, forests, or explore around Dungarvan. They can either photograph as part of a group or go their own way. Locations less than an hour from Dungarvan include The Mahon Falls, Crough Woods, Cumshingaun Lough, The Cunnigar, Ardmore, Lismore, and the Copper Coast.
On Saturday afternoon, Peter Fitzsimons and John Higgins will hold a Wet Plate collodion demo from 3 pm to 5 pm at the Enterprise Bar. Later that evening, participants can enjoy dinner at one of the many restaurants in town and then meet up at the Enterprise Bar for a friendly gathering, where they can discuss their day and photography.
On Sunday morning, participants can continue shooting in a new location or have coffee with friends to discuss photography. Mid-day, people start heading home, some via the Copper Coast, stopping to do some photography at various locations en route.
There are no set times for The Gathering, but participants can start “gathering” on Friday evening at the Enterprise Bar in the Square. If they travel down early on Saturday morning, they can contact Julian or Peter, who will provide information on where the group has gone.
If anyone is new to film photography and would like to see what it’s all about, they are welcome to attend, even if they don’t own a film camera let us know before hand and we will see if we can find one for you to try.
Locations less than an hour from Dungarvan include:-
The Mahon Falls – Crough Woods (Woods walk, river boulders, waterfalls)
Cumshingaun Lough – (Mountain track to lake surrounded by high cliff)
The Cunnigar (views across to Abbyside and bird life)
Ardmore (Round Tower and Church) – Goat’s Island – Helvick Head harbour.
Lismore (The Towers)
The start of the Copper Coast – Clonea Strand ( Early morning swimmers) – Ballydowane beach (Sea tower, clilf rock strands) Bunmahon beach(Sea Tower – old fronts of workers houses) – Tankardstown (Old Copper Mines workings) – Annestown (Nature walk) On to Tramore or cut up to Kilmacthomas ( join the Greenway)
Dungarvan Town – There’s many unexpected optional images to be shot, one just needs to wander and look. You never know who might pop-up to photograph as well and plenty of opportunities for some street photo work.
If you want Peter or Julians contact information message me and I will connect you.
Ferrania Film P30, Black and White Film, Shot with Olympus RC35 Developed in Kodak Tmax
If you’re a film photographer or simply interested in the art of analog photography, chances are you’ve heard of Ferrania Film P30. This classic film stock has been around for decades, and has garnered a cult following among photographers who love its unique look and feel. In this article, we’ll dive into what makes Ferrania Film P30 so special, how to shoot with it, and some tips for getting the best results.
What is Ferrania Film P30?
Ferrania Film P30 is a black and white film stock that was first introduced in the 1960s by the Italian company Ferrania. It quickly became popular among photographers for its fine grain, high contrast, and rich tonal range. However, production of Ferrania Film P30 was eventually discontinued in the early 2000s due to declining demand for analog film.
In recent years, Ferrania Film P30 has experienced a revival thanks to a successful crowdfunding campaign that allowed the company to restart production. Today, Ferrania Film P30 is once again available for purchase, and has become a favourite among film photographers who appreciate its classic look and feel.
Ferrania P30 35mm 36 exposures
Shooting with Ferrania Film P30
If you’re interested in shooting with Ferrania Film P30, there are a few things you should keep in mind. First and foremost, it’s important to note that this film stock has a relatively slow speed of ISO 80. This means that it’s best suited for shooting in bright, well-lit conditions, or with a tripod to ensure sharpness.
When it comes to developing Ferrania Film P30, there are a few different options available. Some photographers prefer to develop it using traditional methods, while others have had success with more experimental techniques such as stand development or using caffenol (a coffee-based developer). Ultimately, the best method will depend on your personal preferences and the look you’re going for. The photos here where all developed in Kodak Tmax
Ferrania Film P30, Black and White Film, Shot with Olympus RC35 Developed in Kodak Tmax
Tips for Getting the Best Results
If you’re new to shooting with Ferrania Film P30, there are a few tips and tricks you can use to get the best results. Here are some of our favorites:
1. Experiment with different developers
As mentioned earlier, there are a variety of developers you can use when developing Ferrania Film P30. Experimenting with different developers can help you achieve different looks and styles, so don’t be afraid to try something new.
2. Shoot in bright, well-lit conditions
Since Ferrania Film P30 has a relatively slow speed of ISO 80, it’s best to shoot in bright, well-lit conditions to ensure proper exposure and sharpness.
3. Embrace the grain
One of the hallmarks of Ferrania Film P30 is its fine grain. Rather than trying to eliminate the grain, embrace it and use it to your advantage to create a unique and textured look.
4. Don’t be afraid of high contrast
Ferrania Film P30 is known for its high contrast, so don’t be afraid to embrace this aspect of the film. Use it to create dramatic and impactful images that stand out.
Ferrania Film P30, Black and White Film, Shot with Olympus RC35 Developed in Kodak Tmax
Conclusion
Ferrania Film P30 is a classic film stock that has become beloved by film photographers for its unique look and feel. If you’re interested in shooting with this film stock, there are a few things you should keep in mind, such as its slow speed of ISO 80 and the different development techniques you can use to achieve different looks. With a little experimentation and some practice, you’ll be able to create stunning images with Ferrania Film P30.
Ferrania Film P30, Black and White Film, Shot with Olympus RC35 Developed in Kodak Tmax
Ferrania Film P30, Black and White Film, Shot with Olympus RC35 Developed in Kodak Tmax
Ferrania Film P30, Black and White Film, Shot with Olympus RC35 Developed in Kodak Tmax
Single use cameras, also known as disposable cameras, are compact and affordable cameras that come preloaded with a roll of film. They are perfect for people who want to capture special moments without investing in expensive photography equipment or film processing. In this guide, we’ll explore the benefits and drawbacks of single use cameras, how to use them effectively, and how to choose the best one for your needs.
What is a Single Use Camera?
A single use camera is a small and lightweight camera that comes preloaded with a roll of film. These cameras are designed to be used once and then disposed of, making them a great option for people who want to take pictures without investing in expensive photography equipment.
Benefits of Single Use Cameras
Affordability
One of the biggest benefits of single use cameras is their affordability. They are much cheaper than buying a traditional camera and film separately, making them a great option for people who are on a tight budget.
Convenience
Single use cameras are also very convenient. They are small and lightweight, making them easy to carry around and use on the go. Plus, you don’t have to worry about things like changing lenses or batteries.
Easy to Use
Another benefit of single use cameras is that they are very easy to use. Most models come with basic features like a flash and a viewfinder, so even beginners can get great results.
Drawbacks of Single Use Cameras
While there are many benefits to using single use cameras, there are also some drawbacks that you should be aware of:
Limited Features
Single use cameras have limited features compared to traditional cameras. You won’t be able to adjust things like shutter speed or aperture, which can limit your creativity.
Limited Capacity
Single use cameras also have a limited capacity, typically only 24 or 36 exposures. This means that you’ll need to be selective about the shots you take.
Film Processing
Another potential drawback of single use cameras is the need to have the film processed after you’ve taken your pictures. This can be time-consuming and expensive, especially if you opt for higher-quality processing.
Ilford HP5 single use film camera
How to Use a Single Use Camera
Using a single use camera is very simple. Here’s a step-by-step guide to get you started:
Remove the camera from its packaging and remove any protective film covering the lens.
Turn on the flash (if necessary).
Look through the viewfinder to frame your shot.
Press the shutter button to take your picture.
Advance the film to the next frame by winding the film advance wheel (if necessary).
Once you’ve taken all of your shots, rewind the film back into the camera.
Take the camera to a photo lab to have the film processed.
How to Choose a Single Use Camera
When choosing a single use camera, there are a few things to consider:
Film Type
Single use cameras come in different film types, including colour,black and white, and even infrared. Consider the type of pictures you want to take and choose a camera with the appropriate film type.
Flash
If you plan to take pictures in low light, make sure the camera you choose has a flash. Some models have a built-in flash, while others require you to manually turn on the flash.
Brand
There are many different brands of single use cameras, including Kodak, Fujifilm, and Ilford. Consider the reputation and reviews of each brand before making your choice.
Conclusion
Single use cameras are a great option for people who want to take pictures without investing in expensive photography equipment. They are affordable, convenient, and easy to use. While there are some drawbacks, such as limited features and capacity, they are still a great option